Like many of my other unusual projects (like
all my cooking stuff, my
pirate sword, and
Small Pond's first
barn quilt), I figured the new jetpack for my Pilot stilting costume (to replace my first jetpack built for the 2014
Firelight Lantern Festival) would also be undertaken by the
Special Projects Division. But, this fall, I'll be getting involved in some
highly unusual projects (dealing with Small Pond airborne mythology, alternate realities, and a few personal builds) that will all be realized through various scale models and dioramas.
Yup: I'm getting back into model-making after a hiatus of about 15 years.
So I've created the
Small Pond Shipyard (with fancy logo and slogan) to deal with these creations and, since the new jetpack is flight-related, it makes sense that it would be the Shipyard's first assignment. The Special Projects Division is still active, with at least two new projects already lined up.
Jetpack Mk 1
The Mark 1 was really just two sturdy cardboard tubes painted silver and mounted on a backpack, with fabric "flames" attached to their bottoms. Not bad, really, but I wanted to see if I could improve on the design in time for my next gig at the
2015 Skeleton Park Arts Festival.
My first idea for the Mk 2 was to build a
simplified version of the jetpack from
The Rocketeer using a couple of plastic 2L pop bottles painted silver, and just re-use the "flames." But maybe I could improve on
that, too...
Rough mock-up.
So I went to the hardware store, looking for anything that looked suitable for kitbashing together something flight-worthy. As soon as I saw those aluminum parts in the heating-cooling section, and discovered those black plastic things fit together nicely, I mentally redesigned the jetpack right there in the aisles.
Another redesign.
Abandoning the three pop bottle approach from the first mock-up, I decided a cardboard box would provide a better body. I bought two of those circular vents, but couldn't find a place for both, as I didn't want to (and, at this time, didn't know how to) cut into the sides of the aluminum units.
Simpler.
This simplified version was good, but a little too simple, so I added some bits on the fly:
Pointy.
Aerodynamic, shmaerodynamic: I needed something to break up the flatness, so the other corners of that same box came into use. That paper airplane-inspired detail looks cool, too.
Backside.
Instead of just a cone at the top, I wanted to create the suggestion of a jet engine's air inlet by building a cardboard collar around the cone.
Front side.
I really wish I had a way to easily inset that vent into the pop bottle so the sides are as flush as the top and bottom, but I just didn't have the wherewithal.
Fuel tanks.
The bottom area was still very flat, and, since I'd nixed the larger plastic bottles, I went on a search for a couple of smaller ones to act as fuel tanks to be connected by hoses to the body. These water bottles were perfect because they were smooth like pressurized gas canisters. I used clothesline because the braided steel hoses couldn't attach to them on their own. You can sort of see that I tied the ends of the lines to washers inside the bottles.
Fuel tanks installed.
I cut a panel out of the back side to make the bottles' installation easier and give me access for the final attachment of the hoses.
Ready for maché.
Still making it up as I went along, the braided hoses went (bent) easier into the body of the jetpack rather than just above the black thruster bells like I intended...and they look cooler as a result. The back still looked a little flat, so I added three fins (see only two above, but all three below).
First layer.
The first layer of paper maché was white paper, the second layer was newspaper and flyers (colour and black & white). This makes it easier to keep track of what you've covered. The hoses are masked here early so I don't get glue all over them during the maché process. That vent's non-flushness still kinda bugs me...
Primed.
Everything looks great and unified (if a little rough from the maché) after priming. Except that I
completely forgot to add the rivets!
Riveted.
Luckily, there was just enough primer to cover the rivets after I painstakingly hot-glued them on. To me, the difference is like night and day. What did I use for the rivets? Googly eyes, of all things. The holes you see are where the bolts for attaching the jetpack to the backpack will go.
The backpack.
I sacrificed an old backpack and cutting off most of its pouch, leaving the padded pocket, sturdy back, and the straps. The bolts are just a touch too long for the jetpack, so I cut them down with a hacksaw. Unfortunately, getting the shorter bolts through the body was harder than I thought, so I ended up using only the top two bolts. Sturdy enough for stilting.
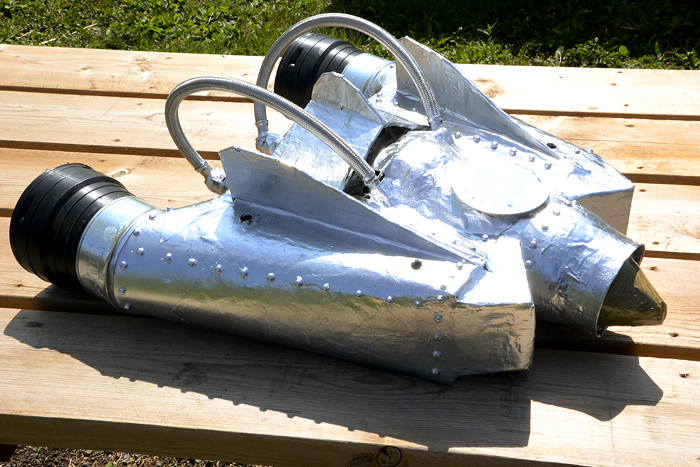
Chrome.
I was skeptical about this "chrome" spray paint, but it's quite good...and would look better if my paper maché layers were smoother. Good enough for stilting.
Another shiny angle.
As of this posting, I've attached the jetpack to the backpack and it seems to fit me well. The question now is, do I remove the fabric "flames" from the Mk 1 and add them here, or just leave the thrusters empty? Or do I build something (perhaps out of paper maché) to be beefier, but more stylized flames? Time is running out: the Skeleton Park Arts Festival is this Saturday...
Pictures of the complete jetpack can
be seen in the build log UPDATE
I've also created hubs for my significant project themes:




Comments