In the last shots of
Part 1 I had done a test-fit mock-up of the various truck parts before final assembly, but there was still a ways to go before completion.
Open sesame!
Unlike the grill of the
Version 2 truck, this one came closed (which is weird, considering it's a slightly larger scale). Rather than leaving it and just painting it black, I opted to open up the grill and install some mesh behind it.
You can see the sequence above: original closed grill, then many tiny holes drilled with my pin vise, then more holes using a larger bit, then cleaning it up with a sharp blade and a file until...
Cleaned up!
Opening up the grill took a while, but it was satisfying and made it more realistic, so it was worth it.
Multi-prep.
Clockwise from top centre: the backs of the tail lights are painted silver (clear red will later go on the outside...and I had to deal with some weird fit issues for the tail lights, resulting in some slight gaposis that I couldn't fix); the back window of the cab is installed and held in place (this part also had major fit issues and had to be filed down considerably to fit properly...or, rather, acceptably); clear orange was used for the turn signals on the grill; and the side mirrors were masked off so the brackets could get a dull coat to take down the shine a bit, leaving the shiny chrome mirrors...mirror-like (except for the annoying injector pin marks
dead centre in the mirrors! Annoying, but not something I felt like fixing).
Standing by...
Lots of installations here: tail lights (painted with Tamiya clear red); headlights (their backs painted with Tamiya chrome silver; and the interior of the cab and the windshield. Unlike the drama of Version 2 where I forgot to install the rear-view mirror before installing the windshield, I actually misplaced the rear-view for this truck and decided to just skip it entirely.
Rusty chassis.
Even though no one will likely see the bottoms of my models, I feel the need to be as complete as possible (within reason and my abilities), so I took the time to weather the bottom in multiple passes, first, here, with some Tamiya orange using a piece of a cleaning scrubbie.
Rusty bed.
Using that same scrubbie, I applied some Tamiya hull red, titanium silver, and orange, back and forth until I was satisfied.
Dusty chassis.
Using some Prismacolor NuPastel chalk (scraped with the back of my X-Acto blade to get a fine powder) I applied a dusting with a paint brush all over the place. I fixed the powder in place with a few light sprays of Testor's Dull Cote.
Dusty bed.
More chalk dusting (see above).
The red hood.
Mild rust added and a light splash of chalky/muddy cement water or something.
Mud splashes.
I applied the splashes with a toothbrush on Version 2, but used a paint brush here (a toothbrush uses more paint and the paint needs to be thinned down a lot, but I used the paint (Tamiya buff) straight outta the pot for this application.
WTF, Revell?
When it came time to attach the side mirrors I noticed to my slight dismay that there were no locator points (indentations) in which to accurately install the brackets. The instructions seem to say "just put them here, like this, where these dotted lines are." Um, okay...thanks Revell.
So I made my best guess and scraped the paint away and used CA glue to attach the brackets. It worked to my satisfaction, but it was still mildly irritating since the other truck (at a smaller scale) had little indentations for the brackets. Anyway, I'll be doing lots of scratch-building, so I'd better get used to making these sorts of surface attachments.
Pre-dust test-fit.
With the body parts attached to the chassis and the fencing cage glued in place, I put the grill and hood on to see what the truck looked like so far...
Frontwise.
So far, so good.
Coffee time!
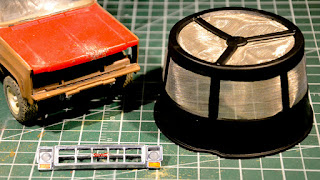
While drilling out the holes for the grill I was brainstorming possibilities for the mesh to go behind it and I remembered my coffee filter which I see daily. It seemed to be the right scale –or convincing enough, anyway– so I got a new filter and cut it to size. Then I painted it flat black and attached with with some C-A glue.
Nice grill.
And the coffee filter mesh looks good!
Fencing buddies.
The title shot at the top of this post is the most complete state this truck will be in for a little while until I finish the fencing material and other supplies to go in the backs of both trucks (I need to print the cement bags (to be constructed and then made to look like they're full of powder) and the license plates). I also need to add a little more weathering like streaks and splashes and re-do the panel lines (because the chalk got in there and messed things up).
Once all that is done, I'll take the truck out and go around town shooting it in various locations. Maybe I'll make another plaster base with some curb.
Until then, here are a couple of outside shots of both trucks (taken before the grill was finished on Version 1).
Fencing pals.
Finally! Licence plates!
I don't remember the actual plates of my uncle Kiro's truck/s, so I made this up (cheekily including his name). I built the graphic in Photoshop and then printed a bunch at Staples; simple colour laser copies, which I ten applied using superglue. I think they look great (the ones I managed to apply straight, anyway...).


Comments